How to Add Music in CapCut Template
Adding music to your videos can dramatically boost their emotional appeal, viewer engagement, and overall quality. If you’re using CapCut, one of the most popular video editing tools today, you might be wondering how to add music in CapCut template without hassle.
Whether you’re editing for social media, a personal project, or professional content, music enhances mood, pacing, and viewer retention. But can you change music on a CapCut template?
The answer is yes! CapCut allows users to add, replace, or customize audio in pre-made templates easily. I will tell you different methods and tips for perfect syncing and troubleshooting common issues.
What is a CapCut Music Template?
A CapCut music template is a pre-made video editing format that includes transitions, effects, and most importantly, music or soundtracks. These templates help users create professional-looking videos without having to design everything from scratch.
They’re widely used for:
- Instagram reels
- TikTok videos
- YouTube Shorts
- Event highlights
The music in these templates sets the tone and energy for your video, making it crucial to choose or customize the track carefully.
Can You Change Music on a CapCut Template?
Many users wonder if they can modify or replace the default audio in a CapCut template. The good news is.
- Yes, you can change the music in most CapCut templates.
- Some templates may have locked audio layers, but you can still mute the original track and add new music.
- If a template uses auto-synced beats, replacing music may require minor adjustments.
Now, let’s dive into the step-by-step methods for adding music.
How to Add Music to a CapCut Template (3 Easy Methods)
Method 1: Adding Music from CapCut’s Library
CapCut offers a built-in music library with trending songs, sound effects, and royalty-free tracks. Here’s how to use it:
- Open your project in CapCut and select the template.
- Tap “Audio” (bottom menu) → “Music”.
- Browse categories (Trending, Viral, Mood-based) or search for a specific track.
- Tap the “+” icon to add the song to your timeline.
- Adjust the length by dragging the edges to fit your video.
Pro Tip: Use “Auto Beat Sync” (if available) to match transitions with the music.
Method 2: Importing Your Own Music
Want to use custom audio? Follow these steps.
- Go to “Audio” → “Import” (or “Local” if on mobile).
- Select your MP3 or WAV file from your device.
- Drag and drop it into the timeline below the video.
- Trim or split the track if needed.
Note:
- Avoid copyrighted music if posting on platforms like TikTok/YouTube (use royalty-free tracks).
- Supported formats: MP3, WAV, M4A, FLAC.
Method 3: Extracting Audio from Another Video
If you like a song from a different clip, you can extract and reuse it:
- Import the video into CapCut.
- Long-press the clip → “Detach Audio”.
- Delete the video layer and keep the audio track.
- Drag it into your CapCut music template.
Using a CapCut Music Template
ome templates come pre-loaded with music and effects synced to beats. These are great for quick edits:
- Where to find them?
- CapCut’s Template Gallery (search “music template“).
- Third-party sites (ensure they’re copyright-safe).
- How to customize?
- Mute the original track and add your own music.
- Adjust clip timing to match the new beat.
Tips for Choosing the Right Music
To make your video stand out, follow these expert tips:
- Match the mood: Upbeat music for fun videos, calm music for tutorials, etc.
- Avoid overpowering: Keep background music subtle when there’s dialogue.
- Use royalty-free music: Avoid copyright issues on platforms like YouTube or Instagram.
- Keep it in sync: Make sure the music aligns with scene changes and effects.
Tips for Perfect Audio Syncing
To make your video flow smoothly with the music
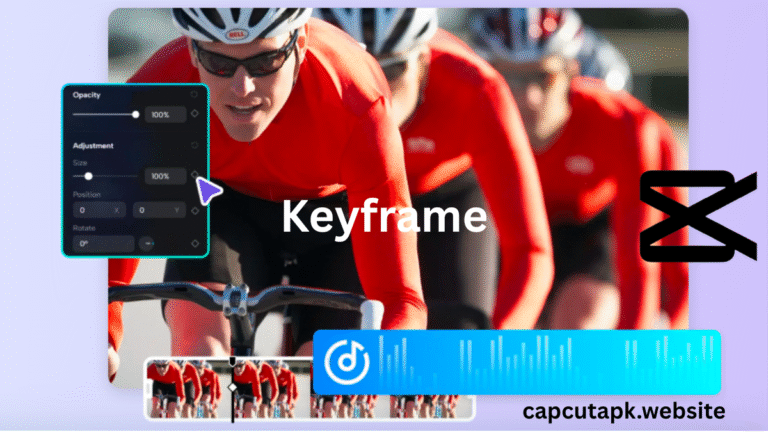
- Use Keyframes – Control volume fade-ins/outs.
- Trim Precisely – Cut music at the right beat.
- Adjust Speed – Slow down/speed up clips to match tempo.
- Use fade-in and fade-out effects for smooth transitions.
- Adjust volume levels to avoid overpowering visuals or voiceovers.
- Preview multiple times to ensure the music enhances, not distracts.
Troubleshooting: Common Issues When Adding Music
Here are some common problems and how to solve them.
| Issue | Solution |
|---|---|
| Music not syncing | Zoom in on the timeline and manually align it with transitions |
| Cannot replace music | Update your CapCut app and check if the template is editable |
| Audio track missing | Ensure permissions are granted to access local files |
| Lag during playback | Lower video resolution while editing for smoother preview |
CapCut Music Template vs. Custom Music Addition
| Feature | CapCut Music Template | Custom Music Addition |
|---|---|---|
| Built-in Music | ✔ Yes | ❌ No |
| Replaceable | ✔ Limited | ✔ Full control |
| Best for Beginners | ✔ Yes | ❌ Not ideal |
| Audio Editing Tools | ❌ Basic | ✔ Advanced |
Similar Issues: CapCut No Internet Connection Problem
Final Verdict
Now you know exactly how to add music in CapCut template and customize it to fit your unique style. Whether you’re creating social media content or personal projects, the ability to modify or add audio gives you more creative control.
So go ahead. Use a CapCut music template, switch out that default song, and let your creativity flow.